![]()
![]()
![]()
![]()
![]()
| Amapi 3D
provides a system for organizing and managing the hierarchy of the elements of the scene:
The Scene Manager. Hierarchy management is very useful when working on complex scenes.
You will able to organize (classify) objects by groups or sub-groups, layers, and
materials.
|
|
||
 |
The Scene Manager is opened through the Control Panel. It is divided into three sections corresponding to the different types of classification available: Group, Layer, and Material. You switch from one section to another by clicking on the tab at the top of the Scene Manager. | ||
The Scene Manager can be left open while you continue to do modeling work in the main window. You can also minimize the Scene Manager to free up additional workspace.
Classification
: |
 |
The Scene Manager is a tool used to manage objects. It
allows you to create groups, to modify them, and also to create a hierarchy.
Of course, the Scene Manager manages the groups you would
have created using the Group/Ungroup tool found in the Control Panel. (See chapter User
Manual/ Modeling help Modeling help tools/Control Panel/Group, Ungroup.)
The management of groups allows you to perform the
following operations:
· Consult
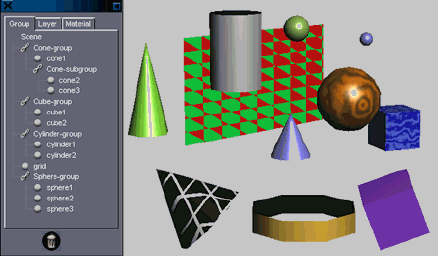
When you open the Scene Manager, Amapi 3D displays an organized
list of the names of groups and objects present in the scene (whether they be
hidden, or locked, or not).
Groups are indicated by a chain link ![]() and objects by spheres
and objects by spheres ![]() .
.
If the entire list cannot be viewed at once, use the arrows at the bottom of the Scene Manager to scroll the list.
To see the composition of a group: Double click on the Group icon; the list of the elements composing this group will be displayed.
To close the list of objects composing a group: Double click on the Group icon; the list of the elements composing this group will be closed.
![]() A
group can be composed only of sub-groups or only of objects or of both.
A
group can be composed only of sub-groups or only of objects or of both.
![]() There
is no limit on the number of groups and sub-groups that you can create.
There
is no limit on the number of groups and sub-groups that you can create.
![]() Objects
and groups are always listed in alphabetical order.
Objects
and groups are always listed in alphabetical order.
![]() Empty
groups or containing only one object cannot be created.
Empty
groups or containing only one object cannot be created.
![]() All
the objects belonging to a group must be on the same layer.
All
the objects belonging to a group must be on the same layer.
· Select
Selecting an element is useful in the following cases:
· Designating and
identifying and element of the scene. The selected element becomes the current object and
is displayed in cyan in the scene.
· To select elements,
proceed as follows:
· Simple selection (of a single element):
· Click on the
element to be selected.
The object or group name is highlighted.
· Multiple selection, element by element:
· Click on the
first element to be selected, the name of the object or of the group is highlighted.
· Click on the other
elements to be selected holding down the Control key.
· Multiple selection by list:
· Click on the
first element to be selected. The object or group name is highlighted.
· Holding down the
Shift key, click on the last element to be selected. All the elements located between
those two elements in the list are selected.
· Selection by name:
Once an element is selected, Amapi 3D allows you to find
another element by name.
Enter the first few characters of the desired object’s
name using the keyboard. The Catalog will select the first available object whose name
matches the entered string.
![]() Selecting
a group will also select all the sub–groups that are attached to it.
Selecting
a group will also select all the sub–groups that are attached to it.
There are two ways to rename an object or a group:
1st method, using the popup menu:
· Select the name
of the element to rename.
· On PC: Click the
right mouse button. On Mac: Hold down the Option key and click.
· Select
“Rename” in the list of choices.
· Enter a new name.
· Validate the entry
by pressing the Return key or clicking on the mouse button.
2nd method:
· Select the
object or the group.
· Click on the name
of the element.
· Enter a new name.
· Validate the entry
by pressing the Return key or clicking on the mouse button.
![]() There
is no limit on the length of the names you use. However, if a name is longer than nine
characters, it will not be displayed entirely in the Data Window.
There
is no limit on the length of the names you use. However, if a name is longer than nine
characters, it will not be displayed entirely in the Data Window.
There are different ways to delete an element (object or group):
1st method: Using the popup menu
· Select the
element(s) to be deleted.
· On PC: Click the
right mouse button. On Mac: Hold down the Option key and click.
· Select
“Delete” in the list of choices.
2nd method: the Delete key
· Select the
element(s) to be deleted.
· Press the Delete
key of the keyboard.
3rd method: the Trash
· Select the
element(s) to be deleted.
· Place the cursor on
top of the selection.
· Press and hold down
the mouse button (a hand indicates that you indeed made the selection).
· Move the cursor on
top of the Trash icon at the bottom of the Scene Manager.
· Release the mouse
button.
![]() If
you deleted a group, Amapi 3D will delete all the elements and sub-groups contained in
this group.
If
you deleted a group, Amapi 3D will delete all the elements and sub-groups contained in
this group.
![]() If
you deleted objects so that there is only one object left in the group, Amapi 3D will
delete this group and the object will depend on the next lower level if there is one.
If
you deleted objects so that there is only one object left in the group, Amapi 3D will
delete this group and the object will depend on the next lower level if there is one.
The Scene Manager has its own method for hiding objects.
The icon (sphere or chain) of a hidden element is displayed
darker.
Using the popup menu:
· Select the name of
the element you want to hide (object or group).
· On PC: Click the
right mouse button. On Mac: Hold down the Option key and click the mouse button.
· Choose
“Hide” in the popup menu.
![]() You
cannot hide only a single element of a group. If you ask to hide an element of a group,
Amapi 3D will hide the entire group.
You
cannot hide only a single element of a group. If you ask to hide an element of a group,
Amapi 3D will hide the entire group.
The Scene Manager has its own method for showing hidden
objects.
The icon (sphere or chain) of an un-hidden element is
displayed lighter.
Using the popup menu:
· Select the name of
the hidden element (object or group) you want to show.
· On PC: Click the
right mouse button. On Mac: Hold down the Option key and click the mouse button.
· Choose
“Show” in the popup menu.
![]() You
cannot show only one object belonging to a hidden group. If you ask to show an object
belonging to a hidden group, Amapi 3D will show all the elements belonging to this group.
You
cannot show only one object belonging to a hidden group. If you ask to show an object
belonging to a hidden group, Amapi 3D will show all the elements belonging to this group.
You can lock an object or a group. A locked object cannot be edited or moved. Of course, you can always unlock a locked element.
Using the popup menu:
· Select the name of
the element (object or group) you want to lock.
· On PC: Click the
right mouse button. On Mac: Hold down the Option key and click the mouse button.
· Choose
“Lock” in the popup menu. The locked object will be displayed in gray wireframe
in the workspace. You will not be able to designate it as the current object.
You can unlock a locked element (object or group).
Using the popup menu:
· Select the name of
the element (object or group) you want to lock.
· On PC: Click the
right mouse button. On Mac: Hold down the Option key and click the mouse button.
· Choose
“Unlock” in the popup menu.
You can group objects using the Scene Manager.
Creating a new group using the popup menu:
· Select the object
or groups to be grouped.
· On PC: Click the
right mouse button. On Mac: Hold down the Option key and click the mouse button.
· Choose
“Group” in the popup menu.
Inserting new elements in a group:
· Select the
element(s) to be inserted.
· Press and hold down
the mouse button (a hand indicates that your selection is taken into account).
· Move the cursor on
top of the name of the group that you want to insert the selected elements into. Release
the mouse button.
![]() Dropping
a selection onto an object creates a group including the selection and the object.
Dropping
a selection onto an object creates a group including the selection and the object.
![]() A
new group will be called by default “(no name)” and listed in alphabetical order
in the list.
A
new group will be called by default “(no name)” and listed in alphabetical order
in the list.
The Scene Manager gives you a different way to ungroup objects.
Ungrouping a whole group:
· Select the group.
· On PC: Click the
right mouse button. On Mac: Hold down the Option key and click the mouse button.
· Choose
“Ungroup” in the popup menu.
![]() If you
ungroup a sub-group, Amapi 3D will put the elements of this sub-group directly at the root
of the scene.
If you
ungroup a sub-group, Amapi 3D will put the elements of this sub-group directly at the root
of the scene.
Taking an element out of a group:
· Select the
element(s) to be removed.
· Press and hold down
the mouse button (a hand indicates that your selection is taken into account).
· Place the cursor
over the name of the group to which you want to add the element or over the scene root
(the element will not belong to any group).
· Release the mouse
button.
![]() Releasing
a selection above the name of an object creates a new group that includes this selection
and this object.
Releasing
a selection above the name of an object creates a new group that includes this selection
and this object.
There are two ways to get information about an object or a group:
1st method: Using the popup menu
· Select the
element about which you want information.
· On PC: Click the
right mouse button. On Mac: Hold down the Option key and click the mouse button.
· Choose “Get
Info…” in the popup menu.
· Read the
information. (You can make modifications following the instructions in the dialog box.)
· Click on the
“OK” button to validate any modifications you have made, otherwise click on the
“Cancel” button.
2nd method (faster):
· Double click on
the icon of the element you want information about.
· Read the
information. (You can make modifications following the instructions in the dialog box.)
· Click on the
“OK” button to validate any modifications you have made, otherwise click on the
“Cancel” button.
![]() If
you select an element that belongs to a group, Amapi 3D gives you information about the
group, not about the element itself.
If
you select an element that belongs to a group, Amapi 3D gives you information about the
group, not about the element itself.
· Copying a selection into the Catalog
· Click on the
icon of the Catalog ![]() to open it. (See
chapter User Manual/File/Catalog.)
to open it. (See
chapter User Manual/File/Catalog.)
· In the Scene
Manager, select the objects/groups to be copied.
· Place the cursor on
top of the selection.
· Press and hold down
the mouse button.
· Move the cursor.
(It takes the shape of a closed hand to indicate that the elements are selected.)
· Position the cursor
above an empty cell of the Catalog.
· Release the mouse
button.
· Assigning a material to an object or to a group
· Click on the
icon of the Catalog ![]() to open it. (See
chapter User Manual/File/Catalog.)
to open it. (See
chapter User Manual/File/Catalog.)
· Click on the
“Materials” tab.
· Place the cursor on
top of the material you want to assign.
· Press and hold down
the mouse button.
· Move the cursor.
(It takes the shape of a closed hand to indicate that the elements are selected.)
· Place the cursor on
top of the name of the object/group you want to assign the material to.
· Release the mouse
button.
![]() Even
though nothing spectacular happened on-screen, the operation did take place. Open the
“Material” tab of the Scene Manager to verify that the material was assigned to
the designated elements.
Even
though nothing spectacular happened on-screen, the operation did take place. Open the
“Material” tab of the Scene Manager to verify that the material was assigned to
the designated elements.
You can mask one or several layers.
You can also lock selected layers to allow modeling only
on active layers.
You can perform the following operations:
· Consult
When you open the Scene Manager, Amapi 3D displays
and names all the existing layers of the scene plus an empty layer.
A layer can be active (unlocked) or inactive
(locked).
It can be visible (unhidden) or invisible
(hidden).
The current layer is oulined in yellow. Amapi 3D
lists the hierarchy of the elements of the current layer.
The current layer is also the target layer; the
objects you will create will be included in this layer.
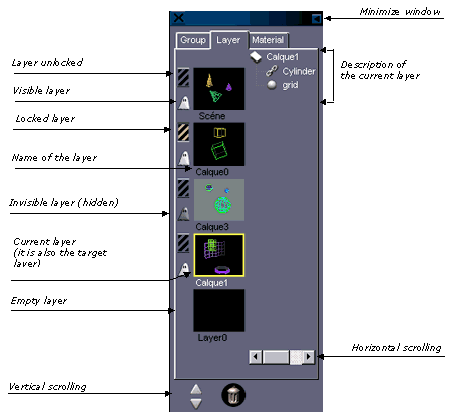
When opening the Scene Manager for the first time,
Amapi 3D sorts all the elements of the scene in a single layer called “Scene”.
![]() Amapi 3D
always organizes and displays layers in alphabetical order.
Amapi 3D
always organizes and displays layers in alphabetical order.
· Select the current layer (and target layer)
The current layer is outlined in yellow. Amapi 3D lists
the details of the hierarchy of the elements of the current layer.
To display the contents of a layer:
· Click on the
thumbnail of the corresponding layer (it becomes the current layer).
The current layer also becomes the target layer: objects that you create subsequently will be included in this layer.
![]() If
you select a layer to check its contents, it becomes the current layer. So, before doing
any further modeling, make sure that the current layer is the correct one.
If
you select a layer to check its contents, it becomes the current layer. So, before doing
any further modeling, make sure that the current layer is the correct one.
· Editing an element of a layer
Amapi 3D lists the contents of the current layer. You
can perform various different operations on the elements listed. You can rename them,
delete them, hide or show them, lock and unlock, copy them into the Catalog, get
information and assign a material to a selection.
The procedure is the same as described previously for
classification and management by groups (see the corresponding paragraphs).
· Renaming a layer
There are two ways to rename a layer:
1st method: Using the popup menu
· Select the layer
to rename. (It becomes the current layer and Amapi 3D lists its contents.)
· Click on the
layer’s name (the root).
· On PC: Click the
right mouse button. On Mac: Hold down the Option key and click the mouse button.
· Choose
“Rename” in the popup menu.
· Enter a new name.
· Press the Return
key to validate or simply click the mouse button.
2nd method:
· Select the layer
to rename. (It becomes the current layer and Amapi 3D lists its contents.)
· Click on the
layer’s name (the root).
· Click again on the
name of the layer.
· Enter a new name.
· Press the Return
key to validate or simply click the mouse button.
· Deleting a layer
· Select the layer
to be deleted. (It becomes the current layer and Amapi 3D lists its contents.)
· Press the
“Delete” key. The layer and its content are deleted.
![]() Amapi
3D does not allow empty layers. It deletes them automatically.
Amapi
3D does not allow empty layers. It deletes them automatically.
· Hiding a layer
A visible layer has a white ghost icon ![]() at its left and its thumbnail has a black
background.
at its left and its thumbnail has a black
background.
To make all the elements of a layer invisible, you need to
hide the layer:
· Click on the ![]() icon at the left of the layer. It is grayed
and the background of the thumbnail becomes lighter indicating that the layer is hidden
(and thus invisible).
icon at the left of the layer. It is grayed
and the background of the thumbnail becomes lighter indicating that the layer is hidden
(and thus invisible).
![]() It is
possible to hide a single element of a layer (see paragraph “Editing an element of a
layer”).
It is
possible to hide a single element of a layer (see paragraph “Editing an element of a
layer”).
· Showing” (unhiding) a layer
A hidden layer has a gray ghost icon ![]() at its left and its thumbnail has a clear
background.
at its left and its thumbnail has a clear
background.
To make all the elements of a layer visible again, you need
to “Show” the layer:
· Click on the ![]() icon at the left of the layer. It becomes
white and the background of the thumbnail becomes darker to indicate that the layer is now
visible.
icon at the left of the layer. It becomes
white and the background of the thumbnail becomes darker to indicate that the layer is now
visible.
![]() It is
possible to unhide (“show”) a single element of a layer (see paragraph
“Editing an element of a layer”).
It is
possible to unhide (“show”) a single element of a layer (see paragraph
“Editing an element of a layer”).
· Locking a layer
The icon ![]() at the left of the layer indicates that it is unlocked: the elements in this
layer can be edited.
at the left of the layer indicates that it is unlocked: the elements in this
layer can be edited.
To make all operations impossible on all the elements of a
layer, you must to lock the layer:
· Click on the icon ![]() at the left of the layer. It changes color,
indicating that the layer and its elements are now locked. Locked elements are displayed
in brown.
at the left of the layer. It changes color,
indicating that the layer and its elements are now locked. Locked elements are displayed
in brown.
![]() It is
possible to lock a single element of a layer (see paragraph “Editing an element of a
layer”).
It is
possible to lock a single element of a layer (see paragraph “Editing an element of a
layer”).
· Unlocking a layer
The icon ![]() at the left of the layer indicates that it is locked: elements included in
this layer cannot be edited.
at the left of the layer indicates that it is locked: elements included in
this layer cannot be edited.
To be able to edit those elements once again, you must
unlock the layer:
· Click on the icon ![]() at the left of the layer. It changes color,
indicating that the layer and its elements are now unlocked.
at the left of the layer. It changes color,
indicating that the layer and its elements are now unlocked.
![]()
It is possible to unlock a single element of a layer (see
paragraph “editing an element of a layer”).
· Moving elements from one layer to another
· Select the layer
containing the element(s) to be moved. (It becomes the current layer and Amapi 3D lists
its contents.)
· In the hierarchy,
select the element to be moved.
· Place the cursor on
the selection.
· Press and hold down
the mouse button.
· Move the cursor (a
hand indicates that the selection is taken into account).
· Place the cursor on
top of the target layer.
· Release the mouse
button. The selection is added to the contents of the target layer.
![]() If
you drop the selection in the empty layer, Amapi 3D will automatically create a new empty
layer.
If
you drop the selection in the empty layer, Amapi 3D will automatically create a new empty
layer.
![]() Amapi
3D does not allow empty layers. It deletes them automatically.
Amapi
3D does not allow empty layers. It deletes them automatically.
![]() It
is impossible to move an object belonging to a group to a different layer.
It
is impossible to move an object belonging to a group to a different layer.
· Assigning a material to a layer
· Select the
layer. (It becomes the current layer and Amapi 3D lists its contents.)
· Click on the icon ![]() to open the Catalog. (See chapter User
Manual/File/Catalog.)
to open the Catalog. (See chapter User
Manual/File/Catalog.)
· Click on the
Materials tab.
· Place the cursor on
top of the material you want to use.
· Press and hold down
the mouse button.
· Move the cursor (a
closed hand indicates that the selection is taken into account).
· Place the cursor
above the root of the of the layer you want to assign the material to.
· Release the mouse
button.
Even though nothing spectacular happened on-screen, the operation did take place. Open the “Material” tab of the Scene Manager to verify that the material was assigned to the selected elements.
The Material tab of the Scene Manager is a tool for managing materials.
· Consult
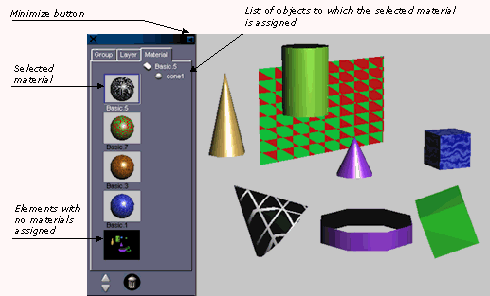
When you open the Material tab of the Scene Manager, Amapi 3D displays all the materials used in the scene. Each material is displayed applied to a sphere. When you select a material, Amapi 3D displays the list of elements to which this material is applied.
![]() Since
a group can contain objects to which different materials are assigned, the classification
by layer cannot take into account the notion of groups.
Since
a group can contain objects to which different materials are assigned, the classification
by layer cannot take into account the notion of groups.
![]() Amapi
3D always lists materials in alphabetical order.
Amapi
3D always lists materials in alphabetical order.
You can perform the following operations:
· Select a material
To display the names of objects to which a given
material is applied:
Click on the thumbnail depicting the material of interest.
It becomes the current material.
· Editing elements that use the same material
Amapi 3D displays the list of the elements to which the
material is assigned. You can perform different operations:
Rename the objects, delete them, hide and unhide them, lock
and unlock them, copy them into the Catalog, get information about them, copy a selection
into the Catalog or assign a different material to the selection.
The procedure is the same as the one described for
classification and management by groups (see the corresponding paragraph).
· Renaming a material
There are two ways to rename a material:
1st method, using the popup menu:
· Select the
material you want to rename. (It becomes the current material and Amapi 3D displays the
list of objects to which this material is assigned.)
· Click on the
material name.
· On PC: Click the
right mouse button. On Mac: Click the mouse button while pressing and holding down the
Option key.
· Select
“Rename” in the popup menu.
· Enter a new name.
· Press the Return
key to validate or click the mouse.
2nd method:
· Select the
material you want to rename. (It becomes the current material and Amapi 3D displays the
list of objects to which this material is assigned.)
· Click on the
material name.
· Click on the
material name again.
· Enter a new name.
· Press the Return
key to validate or click the mouse.
· Delete
![]() You
cannot delete a material using the Scene Manager.
You
cannot delete a material using the Scene Manager.
· Changing the material assigned to an object
· Select the
material currently assigned to the object. (It becomes the current material and Amapi 3D
lists all the objects to which it is assigned.)
· In the list, select
the element(s) to move.
· Place the cursor
over the selection.
· Press and hold down
the mouse button.
· Move the cursor (a
closed hand indicates that the selection is taken into account).
· Place the cursor
over the target material.
· Release the mouse
button.
· Replacing a material with a different one
· Select the
material to be modified. (It becomes the current material.)
· Click on the ![]() icon to open the Catalog. (See chapter User
Manual/File/Catalog.)
icon to open the Catalog. (See chapter User
Manual/File/Catalog.)
· Click on the
Material tab.
· Place the cursor
above the new material in the Catalog.
· Press and hold down
the mouse button.
· Move the cursor (a
closed hand indicates that the selection is taken into account).
· Place the cursor on
top of the root of the current material.
· Release the mouse
button.
![]()
![]()
![]()
![]()
![]()